
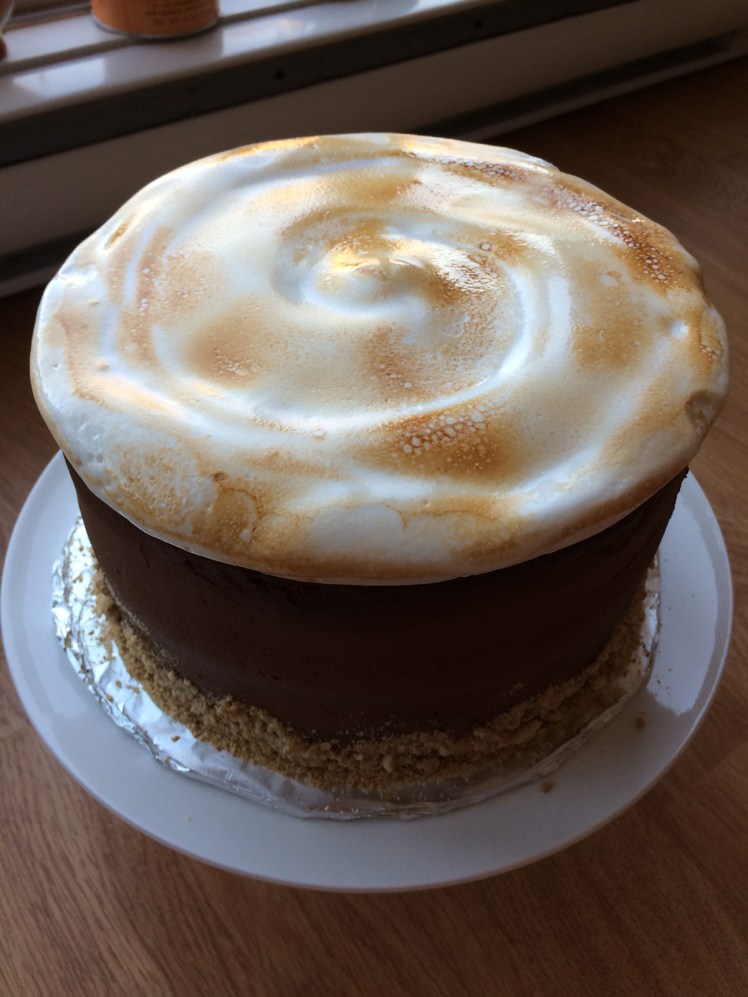

It’s summer! It also happens to be baby season. As in, there are five maternity leaves coming up at work right now. This must be some kind of record? Anyway, all of these baby showers seem to be a great excuse to get my baking back on track! The theme for this shower was a woodsy picnic. What better kind of way to reflect the great outdoors than a s’mores cake?
If you’re a fan of s’mores, you’ll definitely be a fan of this cake. Picture this: graham cracker cake, milk chocolate ganache filling, chocolate buttercream, and two layers of marshmallow. Sound good? It is!
S’mores Layer Cake
Graham cracker cake and ganache filling recipes barely adapted via Smitten Kitchen Cookbook
Marshmallow recipe barely adapted via Butter Cookbook
Chocolate buttercream recipe a bb original!
Yield: one two-layer 9″ round cake and extra marshmallow
Notes: This is a multi-step recipe that you’ll likely need to prep over a couple of days, unless you devote an entire day to baking. I baked the cake layers and marshmallow one day, then did the buttercream and ganache the second day. Don’t be intimidated by making your own marshmallow for this recipe – it’s much easier than you might think, especially if you have a stand mixer! If not, your arm may get a bit tired after 10 minutes of whisking. Note that the marshmallow requires at least 3 hours to firm up before use (I let mine firm up overnight). I recommend making the ganache filling and buttercream for same-day use! You will also need a kitchen torch to achieve the roasted marshmallow effect.
Graham Cracker Cake Ingredients:
Recipe adapted via Smitten Kitchen Cookbook
Dry
- 2 cups flour
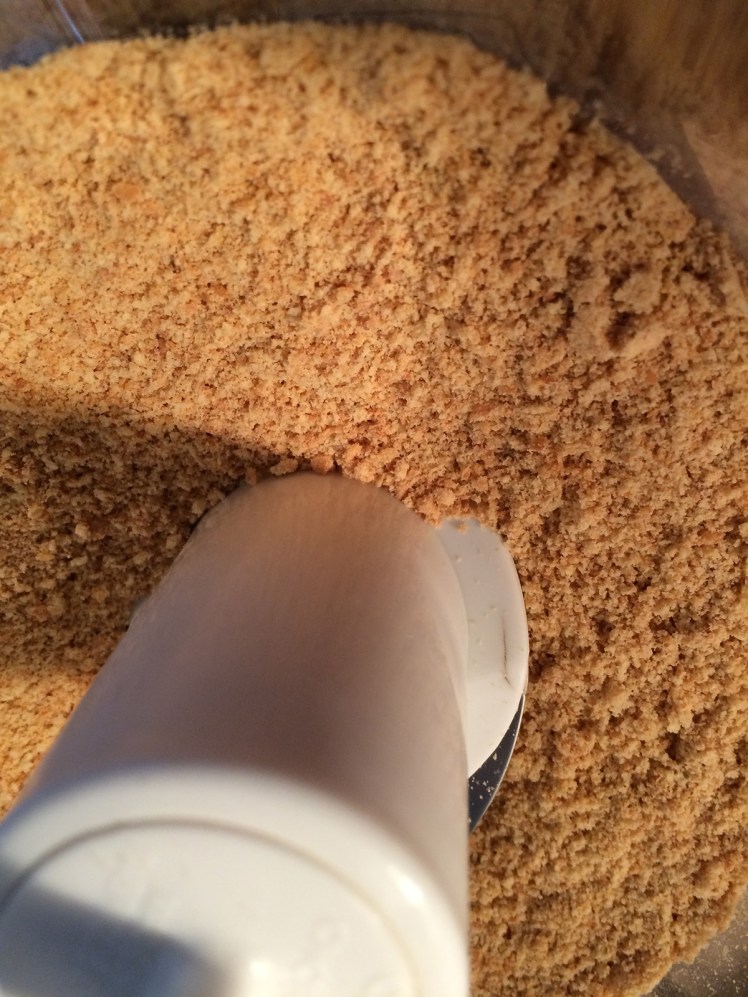
- 2 cups honey graham cracker crumbs (from roughly 14 sheets)
- 2 tsp. baking powder
- ¾ tsp salt
- ½ tsp ground cinnamon
- ⅔ cup sugar
- 1 cup brown sugar
Wet
- 1 cup unsalted butter at room temperature
- 4 large eggs at room temperature
- 2 cups buttermilk (if you don’t have buttermilk, add 1 ½ Tbsp of white vinegar to 2 cups of milk and let sit for at least 5 minutes)
Milk Chocolate Ganache Filling Ingredients:
Recipe adapted via Smitten Kitchen Cookbook
Dry
- 9 ounces or about 1 ½ cups milk chocolate chips or chopped chocolate (or dark chocolate/semisweet, or a mixture of both – your choice! I used milk chocolate for a classic s’mores flavour
Wet
- ¾ cup heavy cream
- A few shakes of salt
Marshmallow Ingredients:
Recipe adapted via Butter Cookbook
- 1 cup water, divided
- 3 envelopes unflavoured gelatin
- 2 cups granulated sugar
- ½ tsp salt
- 1 Tbsp vanilla extract
- (optional) ½ cup icing sugar to coat marshmallows (if you have extra)
Chocolate Buttercream Ingredients:
Dry
- ¾ cup unsalted butter
- 2 cups icing sugar
- 1/2 cup cocoa powder
Wet
- 1 tsp vanilla
- 2 Tbsp heavy cream (or milk)
Cake Directions:
- Preheat oven to 350°F.
- Grease two round 9” cake pans.
- Line the bottom of each cake pan with a circle of parchment paper.
- In a large bowl, whisk together the dry ingredients and set aside.
- In the bowl of a stand mixer fitted with the paddle attachment or in a large bowl and using a hand mixer, cream the butter on medium high until light in colour, 2-3 minutes.
- Add both sugars and cream on medium high until light in colour and fluffy, 3-4 minutes more. Scrape down the sides of the bowl every minute or two.
- Add eggs to the butter/sugar mixture one a time and mix thoroughly to incorporate between each addition.
- Add the ⅓ of the dry mixture and mix to fully incorporate, then add ½ of the buttermilk and mix to fully incorporate. Repeat until your last addition is the final ⅓ of the dry mixture and mix until just barely incorporated.
- Divide the batter evenly between the two prepared pans and gently smooth out the surface with a spatula.
- Bake for 30 to 35 minutes. Cakes are done when a toothpick inserted into the centre comes out clean.
- Cool in the cake pans for at least 10 minutes, then loosen the edges with a knife and flip onto cooling rack until room temperature.
- If you’re not assembling your cake same-day, you can wrap each cooled layer with saran wrap and store in the fridge overnight.
Milk Chocolate Ganache Directions:
- Place chocolate in a heatproof bowl.
- Bring heavy cream and salt to a gentle boil over medium heat.
- Once heavy cream is evenly bubbling, pour over chocolate and let sit for about 1 minute.
- Whisk to combine until all ingredients are evenly incorporated.
- Allow to come to room temperature and firm up so it is spreadable and holds its shape.
- If you are using the ganache same-day, place bowl in an ice bath (careful not to spill water into the ganache) and whisk until thickened. The ganache should mostly hold its shape when ready. This took about 10-15 minutes for me.
Marshmallow Directions:
- For this cake recipe, you will need to butter two round 9” pans and a third pan of whatever shape and size you prefer (I did a 9×9” square pan) for the leftover marshmallow. If you want to just make marshmallows, then butter one 9×9” pan. This will provide roughly 64 1×1” marshmallows.
- In a stand mixer fitted with the whisk attachment, or in a large, heatproof bowl with a hand mixer ready to go, pour ½ cup of water and sprinkle the three packets of gelatin. Set aside.
- In a medium saucepan over medium high heat, add the sugar, corn syrup, salt, and ½ cup water. Bring to a boil and let it bubble for 1 minute, then remove from heat.
- Turn the mixer onto low to break up gelatin for 10 to 20 seconds before very slowly pouring the hot sugar mixture down the side of the bowl. Keep the mixer on low until you’re finished pouring.
- Once the hot sugar mixture is combined with the gelatin, gradually increase your speed to high and continue whipping until the batter is light, fluffy, and roughly three times the original volume. This will take up to 12 minutes.
- Once you reach peak volume, turn the mixer off and add the vanilla. Turn it back up to high and mix for another 20 to 30 seconds, or until the vanilla is evenly combined.
- Working quickly, transfer the marshmallow mixture to the prepared pans. You’ll want to split it evenly between the three pans. One of the round 9” pans will be your centre layer, so try and flatten it out as evenly as you can with a spatula. The other round 9” pan will be the top of your cake, so feel free and get creative with a design (I did a simple, subtle swirl). The third pan is for the extra marshmallow not used in the cake. I don’t recommend making your top and inside round layers too thick, as this will significantly affect the stability of your cake. Aim for 1 to 1.5 cm for the middle layer.
- Cover the round pans tightly with plastic wrap. For the third pan of marshmallow you won’t use for the cake, grease one side of plastic wrap and flatten the greased side evenly and firmly against the marshmallow.
- Allow the marshmallows to set at room temperature for at least 3 hours. I left mine overnight as I made these the day before I assembled the cake.
- For the marshmallow you aren’t using for the cake, remove the plastic wrap and loosen from the pan with a knife. On a surface lightly coated with icing sugar, invert the pan to remove the marshmallow and generously coat with icing sugar. Cut up into desired marshmallow sizes and store in an airtight container or ziplock bag for up to one week.
- For the marshmallow you are using for the cake, leave in the pans until you’re ready to assemble the cake! Once ready, gently loosen the edges of the marshmallow with a knife or spatula, and carefully handle the marshmallow.
Chocolate Buttercream Directions:
- In the bowl of a stand mixer fitted with the paddle attachment, or in a large bowl and using a hand mixer, cream the butter on high until light and fluffy, roughly 2 to 3 minutes.
- Add the confectioners sugar one cup at a time, mixing well after each addition.
- Add the cocoa powder and mix well until combined and fluffy, another 2 to 3 minutes.
- Add the vanilla and mix until evenly incorporated.
- While the mixer is running on low, slowly drizzle in the heavy cream or milk. Continue to mix on high until everything is evenly incorporated, scraping down the sides of the bowl when needed.
- The buttercream should be thick and retain its shape, but also easily spreadable. Adjust to desired consistency by adding additional cream or milk, 1 tsp at a time if too thick, or icing sugar, 1 Tbsp at a time if too thin.
- Buttercream stores well covered in the fridge, but be sure to bring to room temperature and give it a quick whip before using for best results.
Cake Assembly Directions:
- Now that all of your elements are done, it’s time to put them together! I always have my lazy susan ready when frostings cakes. If you don’t have one, never fear! It’s still doable, just challenging to get those perfect lines and smooth edges.
- Start by placing a small dollop of buttercream on the cake tray, plate, or stand. I like to assemble cakes on a piece of cardboard coated in foil, about 1” wider in diameter than the cake. You can buy them at most kitchen stores, or make your own!
- Place one of the two layers (fully cooled or straight out of the fridge if you made it in advance) upside down and centred on the tray.
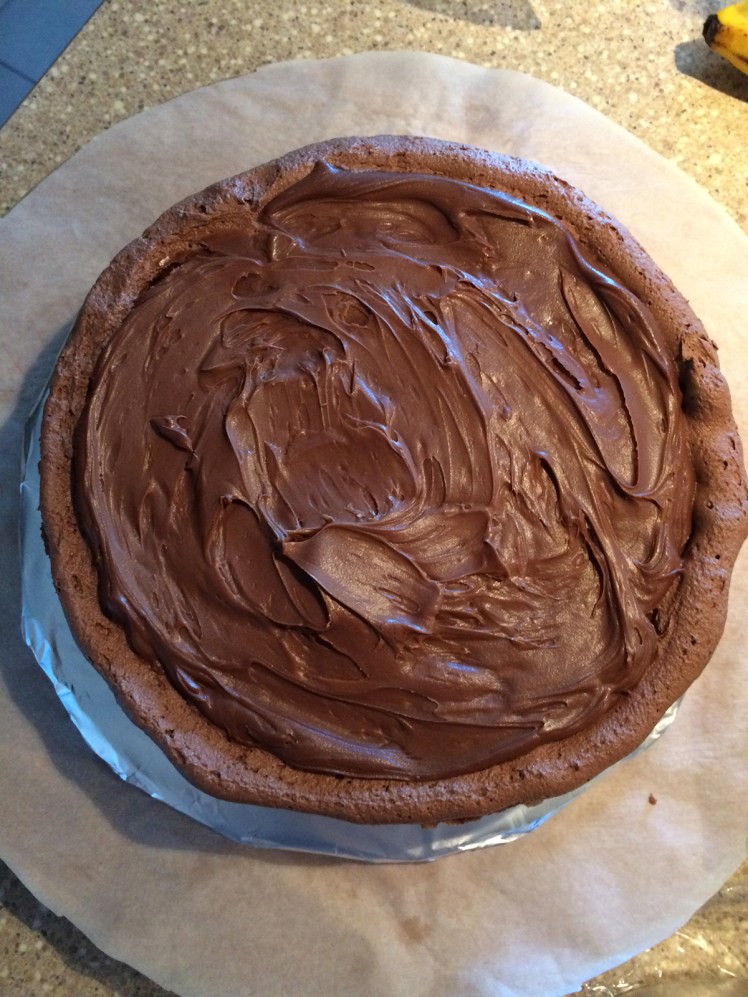
- Using a piping bag or a ziplock bag with a ½” hole cut out of one of the bottom corners, pipe a border evenly around the edge of this layer. Fill the border with a thick layer of the chocolate ganache, once fully cooled and spreadable.
- Now grab your marshmallows. First, unwrap the flat marshmallow layer. Using a serrated knife, trim about ½” border around the entire marshmallow and place the inside circle on top of the prepared cake from step 4.
- Pipe one more ring of buttercream around the marshmallow.
- Place the second cake layer atop the marshmallow/first cake layer.
- Frost the entire cake with a very thin layer. Don’t worry about the top looking perfect as it will be covered with marshmallow soon enough.
- If you have any leftover, gently spread a thin layer of ganache on top of the cake. This is purely optional but a good way to use up the rest of the ganache.
- Place the entire second round marshmallow on top of the cake.
- Using the kitchen torch, briefly torch the top of the marshmallow until it turns golden brown for the roasted marshmallow effect. This will happen very quickly, so keep a close eye on it!
- I assembled this cake one day in advance and left it in the fridge, uncovered, overnight. It was delicious the next day. I recommend serving it at room temperature for the best, more s’mores-y results.

This is amazing!
LikeLike