Nothing makes a get together feel more like a celebration than a frosted layer cake. Nothing makes a meal more delicious than finishing it off with a layer cake. And nothing makes your FIRST blog post more exciting than making it a layer cake! Basically, layer cakes = heaven and I’m ready for death. That being said, the decision of what to make for my sister’s first baby shower was easy: pie! I mean, a layer cake!
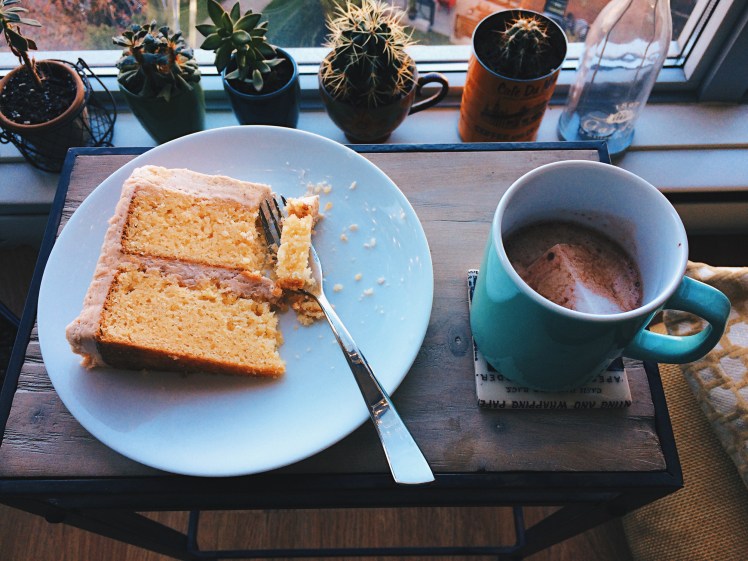
The tartness of the pomegranate molasses helps balance out the sweetness of the buttercream frosting, and the dense, moist vanilla cake is the perfect vessel!
 I fell in love with the Ovenly cookbook the moment I saw its beautiful cover (I am self-admittedly really into cookbook covers). After I learned more about the Brooklyn, New York-based bakery and started trying their inventive recipes (Mustard Spice Cookies, anyone?), my love only grew stronger.
This is my first complete layer cake I have made from the cookbook. Last year, I adapted the same cake recipe to cupcakes for a coworker’s baby shower (so many babies!), but this is the real deal! Read on for delicious inspiration and more butter than I expected.
Vanilla Bean Cake with Pomegranate Buttercream Frosting
Recipe adapted from Ovenly Cookbook
Yield: One two-layer, 9” cake
Cake Ingredients:
Dry
- 4 cups cake flour
- Extra flour for preparing the cake pans
- 2 Tbsps baking powder
- 1 tsp salt
Wet
- 2 cups (1 pound / 4 sticks / 16 ounces) unsalted butter at room temperature
- Extra butter for greasing the cake pans
- 2 ½ cups sugar
- 1 ½ cups heavy cream (whipping cream) at room temperature
- 1 cup sour cream at room temperature
- 6 large eggs at room temperature
- Caviar from 2 vanilla bean pods
Buttercream Ingredients:
Dry
- 4 cups confectioners sugar (icing sugar)
Wet
- 1.5 cups (0.75 pounds / 3 sticks / 5.3 ounces) unsalted butter at room temperature
- ¼ to ½ cup heavy cream
- 2 Tbsps pomegranate molasses (or more to taste – if you’re at a loss for where to find this, try a Middle Eastern supermarket or even Amazon! Note that this bottle was $4 at the supermarket)
- Red or pink food colouring (optional – without it icing will be a pale reddish brown)
Cake Directions:
- Preheat oven to 350°F. Grease two 9” cake pans with butter (be sure to go all the way up the sides!) and dust with flour. Line bottom of pan with parchment paper rounds and grease the rounds.
- In a large bowl, sift together the cake flour, baking powder, and salt. Set aside.
- In a medium bowl, whisk together the heavy cream, sour cream, and vanilla bean paste. Set aside.
- In the the bowl of a stand mixer fitted with a paddle attachment (or using a hand mixer), cream the unsalted butter until light and fluffy, on medium speed, for around 2-3 minutes. Scrape down the sides of the bowl and add all of the sugar. Combine on medium until well combined and fluffy, about another 2-3 minutes.
- Add the eggs to the butter mixture, one at a time. Be sure to turn the machine off between each egg addition and scrape down the sides of the bowl.
- With the mixer off, add ⅓ of the flour mixture to the bowl. Mix on low until the flour mixture is just incorporated. Add ½ of the sour cream mixture, beat on medium-low until just incorporated. Add another ⅓ of the flour mixture and repeat the process, finishing with the last ⅓ of the flour mixture.
- When all the ingredients have been added and appear almost combined, stop the mixer! Use a spatula to stir the butter and incorporate any remaining dry flour from the sides of the bowl. DO NOT OVERMIX – this is what keeps your cake fluffy!
- Divide the batter equally between the prepared cake pans. Place both cake pans in the center of the preheated oven. The original recipe says to bake for 30-35 minutes, or until a toothpick inserted in the center of each layer comes out clean. I ended up having to bake mine for about 50 minutes before a toothpick came out clean, and the cakes still turned out great (despite a crispy top).
- While the cakes are baking, prepare the Pomegranate Buttercream Frosting (see process below).
- Let the cakes cool for 20 minutes before removing them from the cake pans, then let them cool completely on a wire rack. I cooled the cakes upside down on a wire rack.
- Frost the cakes with the Pomegranate Buttercream Frosting (see Assembling & Frosting the Cake below).
Pomegranate Buttercream Frosting Directions:
- Using the paddle attachment in a stand mixer (or the regular attachment on a hand mixer), cream the butter on medium-high until very light and fluffy, about 3 minutes.
- Stop the mixer. Scrape down the sides of the bowl. Add 4 cups of confectioner’s sugar and mix on low until incorporated (about 1 minute).
- While mixer is on low, drizzle in 1/4 cup of heavy cream.
- Beat frosting on medium-high for another 3-4 minutes. If the consistency is too thin, add more confectioners sugar 1/2 cup at a time. It it is to thick, add more heavy cream 1 tablespoon at a time.
- (Optional) Turn the mixer back to low and drizzle in the pomegranate molasses, then return to high to fully incorporate. You will now notice the frosting is a pale, reddish brown. Add the red food colouring in stages – start with at least 4 or 5 generous drops, mix until combined, then assess the colour. My frosting was a bit paler than I had wished. I also made this cake one day in advance and noticed the frosting got slightly paler overnight with the cake in the fridge. Keep this in mind if colour is important to you!
Assembling & Frosting the Cake
- I always like to use a cake board when icing cakes, it makes it much easier to transport, arrange on a cake tray, and have a vessel to give away leftovers. If you don’t want to spend the few dollars on one (which I usually don’t), then you can easily make one with a piece of cardboard. I usually trace the wider side of the cake pan (normally the top!) on a piece of cardboard, cut it out, then cover with tinfoil.
- Level your cake layers. This just means use a serrated knife (like your bread knife, or something nice and long), and cut off the rounded top of the cake so it is level. Don’t worry about “wasting” this part or how the cake will look – your crumb coat will hide any accidents, and you can eat this as a snack while you go.
- Using an offset spatula (one of my favourite baking utensils!), place a small dollop of frosting on the cake board and center the first layer of the cake on top.
- Add a generous layer of frosting on the top of this cake. It doesn’t have to look perfect as the other layer will go on top.
- Center the second layer on top. Add a thin layer of frosting along the top and down the sides of the cake. It doesn’t need to be perfect – this is the crumb coat.
- Place the cake in the freezer for about 15 minutes so the crumb coat can set (this will make frosting the rest much easier!).
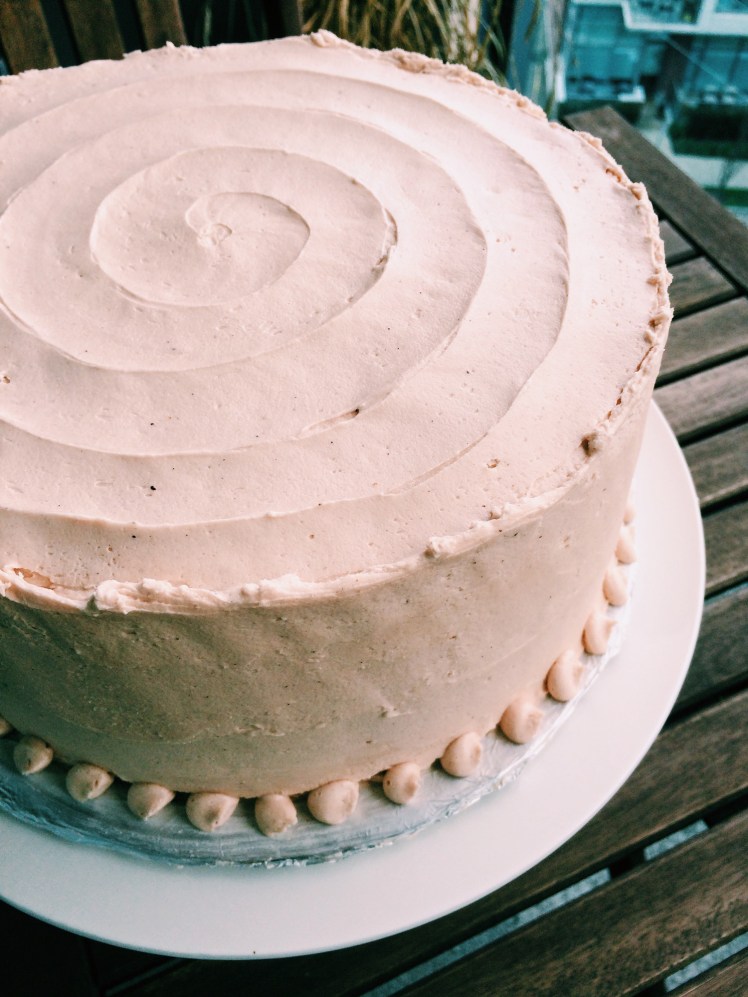
- Frost the rest of the cake! A very handy tool for this is a lazy susan. If you are a perfectionist and are trying to smooth out or level the top of the cake, dip the offset spatula in a glass of hot water – don’t worry about wiping the water off the spatula, it will melt and combine into the frosting.